I'd be willing to bet that if you're fortunate enough to own a home, you've had to do some improvements on it. Maybe even saved a couple bucks by doing it yourself, and learning some stuff along the way. Let's use this thread to share our gained knowledge!
I'll start. Just wrapped up phase 1 of installing new windows on my home. The home itself was built in 1915, and some time in the early 80s or late 70s, there was a "reno" done that replaced the original windows with "modern" aluminum framed double-paned windows. However, these windows still suck horribly at insulatiion. I could FEEL the cold coming off of them in the winter. And, the front picture windows didn't even have frames! They were literally just a couple pieces of glass with a spacer in between.
One weird thing about the windows I pulled is that they were in some sort of module frame, so all that they did was litereally just plonk the window/frame combo in the hole, and then they used the interior and exterior trim to secure it in place. No insulation, no vapor barrier, not even nails into the house frame.
So, I had to do all that.
So, to rewind a bit, let me give you a mental image of my house. Imagine a box. From the front, you have picture window, entry, picture window. On the right side you have 3 single-hung windows along the length of the house, one for each room on that side. There are a couple smaller picture windows towards the back, but since I didn't replace those yet we can ignore those for now.
What I did was replace the two front picture windows and the three side single-hung windows with modern vinyl framed windows that have actual ratings for my region (PacNW). I did replace the "front" room's single-hung with a casement that opens out, because in the summertime I want that window to catch the breeze as they blow in from the west, and channel that are into the house.
Here's some various photos from the project:
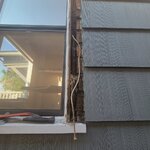
This is a good example of what I ran into after removing the exterior trim. It's not as apparent from the inside, because in many cases the frame that these old windows sit in was likely determined based on the interior opening, not exterior. You can see this very wide gap between the original window opening (and the original window counterweights!). The shiplap in the back is on the inside of hte wall. Strangely, this house has a very thick sandwich - it goes exterior cedar shake >> shiplap >> timber framing >>interior tongue&groove>>drywall. You can see that the window and its frame are basically a single unit. AND, because the windows mounted in the middle of its frame, and the frame is just plonked down in the opening, you have a pre-built in sill that slops, but also is TOO deep outside, and too shallow on the inside.
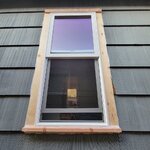
Ha! I should have taken more "during" photos, but I'll just have to describe what I did instead. So, these new windows were measured based on the "frame" dimensions of the old windows, because I wanted to have as close to the original viewing size as possible. And, it worked out pretty well I think. What I did was take 2x6 timber, and rip it down to be the same width as the timber frame + shiplap siding, or about 4.25" inches. I would pre-build that frame around the window (with appropriate wiggle room), and then put that frame in the opening and use any necessary wood spacers to fit between ,and then nail it all in place to the actual framing. Then, I used 9" wide flexible tar-based flashing all around the opening, extending from the edge of hte original trim gap, and around the framing. That was stapled in place. The one thing to be aware of with that is that you need to layer them with a plan; you don't want any seam or overlap to catch water, so you basically have to start from the bottom and work your way to the sides, then top, and make sure you are overlapping so that water can't get into the seam.
Since this is an old home, there's some slight settling, so I had to make a decision on wether or not I wanted the window "true" level or "house" level. For the side windows, I chose "house" level and I think that was the right choice. The front picture windows were "true" level, and that required a slight amount of finessing, but since the entry door is also "true" level, I think it matches OK.
Each trim piece was measured specifically for its place, and fortuantely there wasn't too much finessing that had to get done. Once they were nailed in place, then I went back with exterior caulk and sealed up every single nail hole and gap or join that I could find.
I also cut a 10 degree chamfer on the top plate and on the sill, for water shedding. one thing I stupidly FORGOT to do was install a drip cap on the top, because I am an idiot. So, that'll be next spring's project. I did get ONE window with a drip cap, but still....
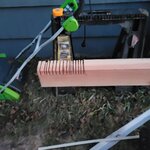
This shows the dado cuts I made for the exterior sill. Each sill had to get each ear cut to cover up the bottom of the side trim pieces. I used a wood chisel to knock out the small biscuits and smooth out the inside of the notch.
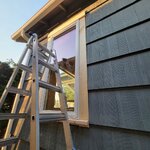
This is the casement window for the front room - pre-sealing of the trim. It opens out so that the "front" edge swings out and catches air as it blows in.
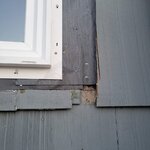
Here's a view of the flashing installed behind the window's lip - all the way to the edge of the existing gap from the original trim, and then wrapped around the framing and all secured in place. Not the overlap from the side piece over the bottom piece. Ignore the small piece of cedar shake that fell off .
.
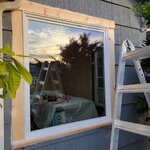
Here's the right front picture window, ready for paint.
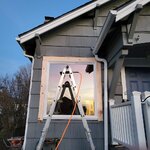
Left front picture window, in the process of trim installation. Note that I did put a drip cap on this one!
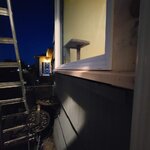
here's the "myspace angle" shot of the bottom plate having been installed, pre-sealing. It's evening because I am slow and it took about 7 hours for each picture window, from removing the first piece of old trim to getting the sealing caulk on.
Paint was just some Behr exterior satin finish paint+primer, two coats on the exterior.
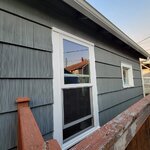
Finished, painted, sealed side mirror.
Apparently I can only attach 10 files, so I can't show you the "finished" front view of the house. You'll just have to take my word for it that it looks good .
.
Things I discovered:
1)Noise isolation is AMAZING. Before, I could hear my neighbors pretty much talking in a normal voice, all the time. I have no doubt they heard me. Any time a car drove by out front, you'd hear it coming and going. Now? soooo quiet.
2)Already I can tell there's a difference in heat retention. the previous windows were always cold on the inside, and you could feel it. the house temp in the winter could drop from 70 to sub 60 in just the space of a few hours overnight. Now? Even with only half the windows updated, it didn't get below 64 degrees last night with the heat turned off, and it was below freezing outside. The furnace during the day doesn't run every hour either. I took an IR temp gauge and pointed it at an old window vs a new window, and with the interior temp 71 degrees, the glass on the new window measured 70. The glass on an old window measured 61.
3)I am going to have actual real depth interior window sills. I can use them to put plants on! or really for the cats to sleep on most likely.
Next steps: I have not yet done interior trim, nor have I used foam to fill in the gaps around the new windows and updated framing. So, that's next on the list. Still debating if I want to try using a live edge piece for the sill plates (I've got a long, narrow cedar slab that has about 15-16ft of useable edge for that), or go with a more traditional look.
I'll start. Just wrapped up phase 1 of installing new windows on my home. The home itself was built in 1915, and some time in the early 80s or late 70s, there was a "reno" done that replaced the original windows with "modern" aluminum framed double-paned windows. However, these windows still suck horribly at insulatiion. I could FEEL the cold coming off of them in the winter. And, the front picture windows didn't even have frames! They were literally just a couple pieces of glass with a spacer in between.
One weird thing about the windows I pulled is that they were in some sort of module frame, so all that they did was litereally just plonk the window/frame combo in the hole, and then they used the interior and exterior trim to secure it in place. No insulation, no vapor barrier, not even nails into the house frame.
So, I had to do all that.
So, to rewind a bit, let me give you a mental image of my house. Imagine a box. From the front, you have picture window, entry, picture window. On the right side you have 3 single-hung windows along the length of the house, one for each room on that side. There are a couple smaller picture windows towards the back, but since I didn't replace those yet we can ignore those for now.
What I did was replace the two front picture windows and the three side single-hung windows with modern vinyl framed windows that have actual ratings for my region (PacNW). I did replace the "front" room's single-hung with a casement that opens out, because in the summertime I want that window to catch the breeze as they blow in from the west, and channel that are into the house.
Here's some various photos from the project:

This is a good example of what I ran into after removing the exterior trim. It's not as apparent from the inside, because in many cases the frame that these old windows sit in was likely determined based on the interior opening, not exterior. You can see this very wide gap between the original window opening (and the original window counterweights!). The shiplap in the back is on the inside of hte wall. Strangely, this house has a very thick sandwich - it goes exterior cedar shake >> shiplap >> timber framing >>interior tongue&groove>>drywall. You can see that the window and its frame are basically a single unit. AND, because the windows mounted in the middle of its frame, and the frame is just plonked down in the opening, you have a pre-built in sill that slops, but also is TOO deep outside, and too shallow on the inside.

Ha! I should have taken more "during" photos, but I'll just have to describe what I did instead. So, these new windows were measured based on the "frame" dimensions of the old windows, because I wanted to have as close to the original viewing size as possible. And, it worked out pretty well I think. What I did was take 2x6 timber, and rip it down to be the same width as the timber frame + shiplap siding, or about 4.25" inches. I would pre-build that frame around the window (with appropriate wiggle room), and then put that frame in the opening and use any necessary wood spacers to fit between ,and then nail it all in place to the actual framing. Then, I used 9" wide flexible tar-based flashing all around the opening, extending from the edge of hte original trim gap, and around the framing. That was stapled in place. The one thing to be aware of with that is that you need to layer them with a plan; you don't want any seam or overlap to catch water, so you basically have to start from the bottom and work your way to the sides, then top, and make sure you are overlapping so that water can't get into the seam.
Since this is an old home, there's some slight settling, so I had to make a decision on wether or not I wanted the window "true" level or "house" level. For the side windows, I chose "house" level and I think that was the right choice. The front picture windows were "true" level, and that required a slight amount of finessing, but since the entry door is also "true" level, I think it matches OK.
Each trim piece was measured specifically for its place, and fortuantely there wasn't too much finessing that had to get done. Once they were nailed in place, then I went back with exterior caulk and sealed up every single nail hole and gap or join that I could find.
I also cut a 10 degree chamfer on the top plate and on the sill, for water shedding. one thing I stupidly FORGOT to do was install a drip cap on the top, because I am an idiot. So, that'll be next spring's project. I did get ONE window with a drip cap, but still....

This shows the dado cuts I made for the exterior sill. Each sill had to get each ear cut to cover up the bottom of the side trim pieces. I used a wood chisel to knock out the small biscuits and smooth out the inside of the notch.

This is the casement window for the front room - pre-sealing of the trim. It opens out so that the "front" edge swings out and catches air as it blows in.

Here's a view of the flashing installed behind the window's lip - all the way to the edge of the existing gap from the original trim, and then wrapped around the framing and all secured in place. Not the overlap from the side piece over the bottom piece. Ignore the small piece of cedar shake that fell off

Here's the right front picture window, ready for paint.

Left front picture window, in the process of trim installation. Note that I did put a drip cap on this one!

here's the "myspace angle" shot of the bottom plate having been installed, pre-sealing. It's evening because I am slow and it took about 7 hours for each picture window, from removing the first piece of old trim to getting the sealing caulk on.
Paint was just some Behr exterior satin finish paint+primer, two coats on the exterior.

Finished, painted, sealed side mirror.
Apparently I can only attach 10 files, so I can't show you the "finished" front view of the house. You'll just have to take my word for it that it looks good
Things I discovered:
1)Noise isolation is AMAZING. Before, I could hear my neighbors pretty much talking in a normal voice, all the time. I have no doubt they heard me. Any time a car drove by out front, you'd hear it coming and going. Now? soooo quiet.
2)Already I can tell there's a difference in heat retention. the previous windows were always cold on the inside, and you could feel it. the house temp in the winter could drop from 70 to sub 60 in just the space of a few hours overnight. Now? Even with only half the windows updated, it didn't get below 64 degrees last night with the heat turned off, and it was below freezing outside. The furnace during the day doesn't run every hour either. I took an IR temp gauge and pointed it at an old window vs a new window, and with the interior temp 71 degrees, the glass on the new window measured 70. The glass on an old window measured 61.
3)I am going to have actual real depth interior window sills. I can use them to put plants on! or really for the cats to sleep on most likely.
Next steps: I have not yet done interior trim, nor have I used foam to fill in the gaps around the new windows and updated framing. So, that's next on the list. Still debating if I want to try using a live edge piece for the sill plates (I've got a long, narrow cedar slab that has about 15-16ft of useable edge for that), or go with a more traditional look.


